Begin by defining the content types that will be
used to classify records throughout your enterprise
- Create content types at the enterprise level using the Managed
Metadata Service
- Create a new Web application and use the Records Centre template
for the site collection.
- Create a records library in the Records Centre for each content
type.
- Define required metadata on the document libraries or content
types.
- Define Information Management Policies to implement the File Plan
rules.
- Create content organizer rules to route documents to the correct
records library.
Creating and Managing Content Types
What are Content Types and why are they
important?
A content type is a reusable collection of
settings that can be applied to a document to categorize its content. Content
types are essential to the proper functioning of your Records Centre because
documents submitted to the Records Centre are automatically organized by
content type
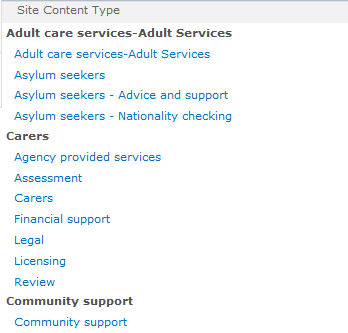
Content Types and the File Plan
For every record type in your file plan, create a
corresponding content type that users can apply to documents
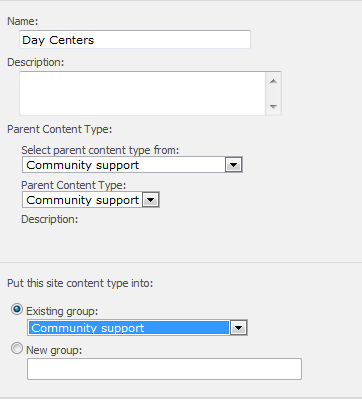
Content Types and Inheritance
Content types support inheritance. This allows you to base a
new content type on an existing content type. In this way you can define a
single content type with specific attributes and create a derived content type
based on it
For
example:
The Financial Statement and Fiscal Report content types might
be two subtypes of the parent type Finance Document, created to distinguish two
specific types of documents in the same general category. Each type could then
be routed into a different records library in the Records Centre or they could
be grouped together
The Records Centre
Records Centre + Content Types + File Plan
The Records Centre site is used in conjunction with content
types in SharePoint 2010 to implement the file plan.
How are Records submitted to the Record Centre?
Records are added to the Record Centre using the Submit A
Record button on the home page or using a farm-wide Send To Records Centre
option
What happens to records when they arrive at
the Records Centre?
When a record is sent to the Records Centre, it is placed in
the Drop Off Library until the Content Organizer rules are assessed, at which
point, if there is a destination available based on content type or metadata,
it is sent to that records library.
If there is not a Content Organizer rule for the document, it
will remain in the Drop Off Library until a records manager determines where
the record should be placed.
The document can be routed to the correct location by
locating the document in the Drop Off Library and then populating the
properties required by a Content Organizer rule that will route it to the
appropriate location
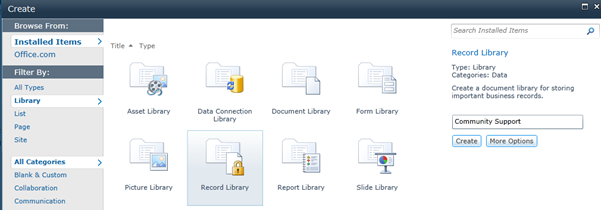
Creating
Records Libraries
·
Each library can hold one type of file or many
different types
·
Files will be automatically routed into the
records libraries based on the locations you configure in the Content Organizer
list
·
You can create folders within records libraries,
and they can be used as destination locations in the Content Organizer rules
·
Folders can be created automatically based on
property values associated with the documents being routed, allowing the
routing not to be based solely on content type
·
Major versioning is automatically turned on when
libraries are created in the Records Centre – can be customized
Defining the required metadata
You can create additional columns (metadata) in the records
library to track metadata that is required by your file plan but was not
present on the original document.
For example, you may want to assign a tracking number to the
file that is generated by an external document tracking system. The user would
then be prompted for this number when sending the document to the repository -
the user is presented with the Missing Properties page to provide the missing
values.
If the user fails to provide any required values or cancels
the Missing Properties page, then the file is still copied to the Records
Centre, but it is placed in the Drop Off Library
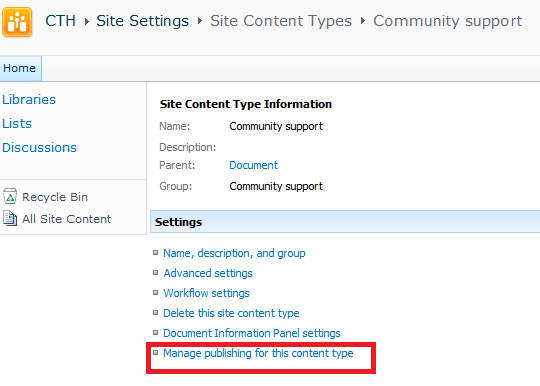
Applying Information Management Policies
·
Each of the records libraries will have
information management policies applied to them to enforce the file plan
distributed earlier
·
You can either apply one policy for the entire
records library or, if you configure the records library to allow multiple
content types, then you can apply a separate policy to each content type
Creating Content Organizer rules
At this point, you want to create the Content Organizer rules
based on either content types or metadata to control where the document will
reside in the Records Centre.
If you are specifying more than one property to determine
where to route the document, all property values must be met to ensure proper
routing.
If you are using content types, you must define what library
you want to receive the document.
Regardless of what rules are used to route the document, all
the records library information management policies are applied to the document
after it is placed in the records library
Placing a Hold on Records
The Records Centre site contains a Holds option that is used to place policy locks on sets of
documents in the Records Centre, preventing them from expiring or being deleted
while on hold.
When an item is placed on hold, all automated expiration
policies are suspended for that item and users are prevented from deleting the
item.
Creating a hold involves creating a new item in the Holds
list, which can be completed by performing a search using the Search And Add To
Hold page
Alternatively, you can also locate the record in the Records
Center, hover over the title of the document until you see an arrow, and then
click Compliance Details to present the Compliance Details page. Click the Add/Remove From Hold link and specify the name
of the hold. You can use these same steps to remove the hold